
Arduino Morse Code Project with Code: Detailed Guide
You must be wondering if there is any way to make the Morse code encoding and decoding converter by yourself? While there are ready-made Morse code translators available, you can still make one by yourself using the Arduino. I completely understand that the preparation can be a bit tricky, and when beginners can’t find the ready-made code, they often get stuck on syntax errors or logic mistakes that can lead to frustration.
Now, no worries as you’ve stepped onto the right article. In this article, we’ve explored all the nitty-gritty of the Arduino Morse code converter, allowing you to make the tool with ease. We not only provided detailed information on making the encoder, but also guided you on how you can make the decoder using Arduino as well. Whether you’re a beginner or a professional, this guide ensures that you can confidently build and customize your own Morse code converter.
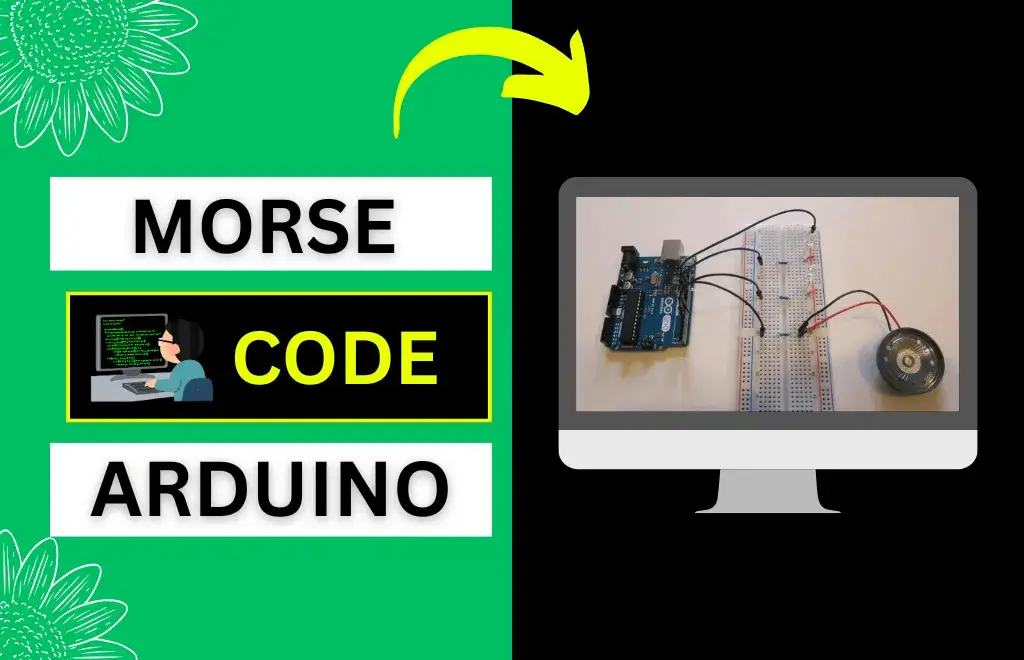
Components Required to Make Morse Code Converter
There are a variety of components required to build an Arduino Morse code converter that will not only convert text to Morse code but also include flashing LED lights along with audio of the translated dots and dashes. We’ve mentioned all of them below so that you can arrange them on the table before building this translator:
- Arduino Uno microcontroller
- Solderless Breadboard
- Resistors of 220 ohms
- 8-ohm Mini Speaker
- 5mm LED Lights
- USB Cable
- Short Jumper Wires of 1 cm
- Longer Jumper Wires of 6 to 10 cm
How to Make a Morse Code Translator Using Arduino?
Making the Morse code translator diy with Arduino isn’t complicated; it just requires a little knowledge of basic electronics, simple coding, and understanding of Morse code logic. Below is the detailed information that you can follow to create this converter easily:
Set up the Circuit Board
Once you’ve gathered all the components, start by setting up the breadboard for connecting two LEDs and one speaker. To do this, from the first row, connect the small jumper to the ground. On a second row, connect a long jumper cable along with a resistor, such that the LED lights and a speaker will be used as a bridge between these two rows. When wiring the LEDs, connect the positive leg (longer head) to the row with the resistor and connect the negative leg to the grounded row.
Start Connecting the Arduino
Once you’ve set up the breadboard, you’ll need to connect it to the Arduino. The code provided below contains output pins 6 and 12 for the LED lights and pin 8 for the audio. Now, connect the two long jumper wires with the LEDs in series to output pins six and twelve on the Arduino. Once done, attach the long jumper wire from the speaker to pin eight. Finish it by connecting an Arduino’s GND pin to the ground bus at the top of the breadboard.
Upload the Provided Code
Start by connecting your computer to the Arduino using the USB cable. Once connected, upload the following code via the Arduino compiler. You can also modify the Morse code string by changing the ‘stringToMorseCode’; it’ll interpret the string and then convert it to the Morse code for both visual lights and audio.
The code understands the string in an array and then uses the GetChar function to convert each character into its corresponding dots and dashes. Although this code currently translates the alphabet only, you can still add additional characters, including numbers and punctuation, by modifying the code at the bottom.
/*
  Morse Code Arduino Project

  This code will loop through a string of characters and convert them to Morse code.
  It will blink two LED lights and play audio on a speaker.
 */


//**************************************************//
//   Type the String to Convert to Morse Code Here  //
//**************************************************//
char stringToMorseCode[] = "Arduino Morse Code Project";

// Create variable to define the output pins
int led12 = 12;      // blink an led on output 12
int led6 = 6;        // blink an led on output 6
int audio8 = 8;      // output audio on pin 8
int note = 1200;      // music note/pitch

/*
	Set the speed of your Morse code
	Adjust the 'dotlen' length to speed up or slow down your Morse code
		(all of the other lengths are based on the dotlen)

	Here are the ratios code elements:
	  Dash length = Dot length x 3
	  Pause between elements = Dot length
		  (pause between dots and dashes within the character)
	  Pause between characters = Dot length x 3
	  Pause between words = Dot length x 7


*/
int dotLen = 100;     // length of the morse code 'dot'
int dashLen = dotLen * 3;    // length of the morse code 'dash'
int elemPause = dotLen;  // length of the pause between elements of a character
int Spaces = dotLen * 3;     // length of the spaces between characters
int wordPause = dotLen * 7;  // length of the pause between words

// the setup routine runs once when you press reset:
void setup() {
  // initialize the digital pin as an output for LED lights.
  pinMode(led12, OUTPUT);
  pinMode(led6, OUTPUT);
}

// Create a loop of the letters/words you want to output in morse code (defined in string at top of code)
void loop()
{
  // Loop through the string and get each character one at a time until the end is reached
  for (int i = 0; i < sizeof(stringToMorseCode) - 1; i++)
  {
    // Get the character in the current position
	char tmpChar = stringToMorseCode[i];
	// Set the case to lower case
	tmpChar = toLowerCase(tmpChar);
	// Call the subroutine to get the morse code equivalent for this character
	GetChar(tmpChar);
  }

  // At the end of the string long pause before looping and starting again
  LightsOff(8000);
}

// DOT
void MorseDot()
{
  digitalWrite(led12, HIGH);  	// turn the LED on
  digitalWrite(led6, HIGH);
  tone(audio8, note, dotLen);	// start playing a tone
  delay(dotLen);             	// hold in this position
}

// DASH
void MorseDash()
{
  digitalWrite(led12, HIGH);  	// turn the LED on
  digitalWrite(led6, HIGH);
  tone(audio8, note, dashLen);	// start playing a tone
  delay(dashLen);               // hold in this position
}

// Turn Off
void LightsOff(int delayTime)
{
  digitalWrite(led12, LOW);    	// turn the LED off
  digitalWrite(led6, LOW);
  noTone(audio8);	       	   	// stop playing a tone
  delay(delayTime);            	// hold in this position
}

// *** Characters to Morse Code Conversion *** //
void GetChar(char tmpChar)
{
	// Take the passed character and use a switch case to find the morse code for that character
	switch (tmpChar) {
	  case 'a':
		MorseDot();
		LightsOff(elemPause);
		MorseDash();
		LightsOff(elemPause);
		break;
	  case 'b':
		MorseDash();
		LightsOff(elemPause);
		MorseDot();
		LightsOff(elemPause);
		MorseDot();
		LightsOff(elemPause);
		MorseDot();
		LightsOff(elemPause);
		break;
	  case 'c':
	    MorseDash();
		LightsOff(elemPause);
		MorseDot();
		LightsOff(elemPause);
		MorseDash();
		LightsOff(elemPause);
		MorseDot();
		LightsOff(elemPause);
		break;
	  case 'd':
		MorseDash();
		LightsOff(elemPause);
		MorseDash();
		LightsOff(elemPause);
		MorseDot();
		LightsOff(elemPause);
		break;
	  case 'e':
		MorseDot();
		LightsOff(elemPause);
		break;
	  case 'f':
	    MorseDot();
		LightsOff(elemPause);
		MorseDot();
		LightsOff(elemPause);
		MorseDash();
		LightsOff(elemPause);
		MorseDot();
		LightsOff(elemPause);
		break;
	  case 'g':
		MorseDash();
		LightsOff(elemPause);
		MorseDash();
		LightsOff(elemPause);
		MorseDot();
		LightsOff(elemPause);
		break;
	  case 'h':
	    MorseDot();
		LightsOff(elemPause);
		MorseDot();
		LightsOff(elemPause);
		MorseDot();
		LightsOff(elemPause);
		MorseDot();
		LightsOff(elemPause);
		break;
	  case 'i':
	    MorseDot();
		LightsOff(elemPause);
		MorseDot();
		LightsOff(elemPause);
		break;
	  case 'j':
	    MorseDot();
		LightsOff(elemPause);
		MorseDash();
		LightsOff(elemPause);
		MorseDash();
		LightsOff(elemPause);
		MorseDash();
		LightsOff(elemPause);
		break;
      case 'k':
	    MorseDash();
		LightsOff(elemPause);
		MorseDot();
		LightsOff(elemPause);
		MorseDash();
		LightsOff(elemPause);
		break;
	  case 'l':
	    MorseDot();
		LightsOff(elemPause);
		MorseDash();
		LightsOff(elemPause);
		MorseDot();
		LightsOff(elemPause);
		MorseDot();
		LightsOff(elemPause);
		break;
      case 'm':
	    MorseDash();
		LightsOff(elemPause);
		MorseDash();
		LightsOff(elemPause);
		break;
	  case 'n':
	    MorseDash();
		LightsOff(elemPause);
		MorseDot();
		LightsOff(elemPause);
		break;
	  case 'o':
	    MorseDash();
		LightsOff(elemPause);
		MorseDash();
		LightsOff(elemPause);
		MorseDash();
		LightsOff(elemPause);
		break;
	  case 'p':
	    MorseDot();
		LightsOff(elemPause);
		MorseDash();
		LightsOff(elemPause);
		MorseDash();
		LightsOff(elemPause);
		MorseDot();
		LightsOff(elemPause);
		break;
	  case 'q':
	    MorseDash();
		LightsOff(elemPause);
		MorseDash();
		LightsOff(elemPause);
		MorseDot();
		LightsOff(elemPause);
		MorseDash();
		LightsOff(elemPause);
		break;
	  case 'r':
	    MorseDot();
		LightsOff(elemPause);
		MorseDash();
		LightsOff(elemPause);
		MorseDot();
		LightsOff(elemPause);
		break;
	  case 's':
	    MorseDot();
		LightsOff(elemPause);
		MorseDot();
		LightsOff(elemPause);
		MorseDot();
		LightsOff(elemPause);
		break;
	  case 't':
	    MorseDash();
		LightsOff(elemPause);
		break;
	  case 'u':
	    MorseDot();
		LightsOff(elemPause);
		MorseDot();
		LightsOff(elemPause);
		MorseDash();
		LightsOff(elemPause);
		break;
	  case 'v':
	    MorseDot();
		LightsOff(elemPause);
		MorseDot();
		LightsOff(elemPause);
		MorseDot();
		LightsOff(elemPause);
		MorseDash();
		LightsOff(elemPause);
		break;
	  case 'w':
	    MorseDot();
		LightsOff(elemPause);
		MorseDash();
		LightsOff(elemPause);
		MorseDash();
		LightsOff(elemPause);
		break;
	  case 'x':
	    MorseDash();
		LightsOff(elemPause);
		MorseDot();
		LightsOff(elemPause);
		MorseDot();
		LightsOff(elemPause);
		MorseDash();
		LightsOff(elemPause);
		break;
	  case 'y':
	    MorseDash();
		LightsOff(elemPause);
		MorseDot();
		LightsOff(elemPause);
		MorseDash();
		LightsOff(elemPause);
		MorseDash();
		LightsOff(elemPause);
		break;
	  case 'z':
	    MorseDash();
		LightsOff(elemPause);
		MorseDash();
		LightsOff(elemPause);
		MorseDot();
		LightsOff(elemPause);
		MorseDot();
		LightsOff(elemPause);
		break;
	  default:
		// If a matching character was not found it will default to a blank space
		LightsOff(Spaces);
	}
}
Test the Arduino Morse Code Project
Once you’ve uploaded the code and everything is done, test the Morse Code Arduino project to make sure everything is correct. The code will run through the Morse code string and then pause for a few seconds before going back to the loop. You can experiment with the code and circuit layout by adding a few extra lights in parallel with each other. You can also change the length of the dots and dashes by experimenting with the “dotLen” variable in the code. Moreover, for adjusting the audio pitch, change the “Note” variable.
Components Required to Make a Morse Code Decoder
Below are the components required to make a Morse code decoder:
- 1x Arduino UNO
- 1x Buzzer
- 1x LCD with I2C connector and four lines of text
- Switch or Morse Key
- Breadboard
- Wires
How to Make a Morse Code Decoder using Arduino?
This Morse code decoder interprets and converts the hand-keyed Morse code into plain text by using a signal key or a Morse switch. Not only that, but it also adjusts to your keying speed. Below are the steps you can follow to make this converter:
- Start by setting up the hardware exactly as shown in the image below.
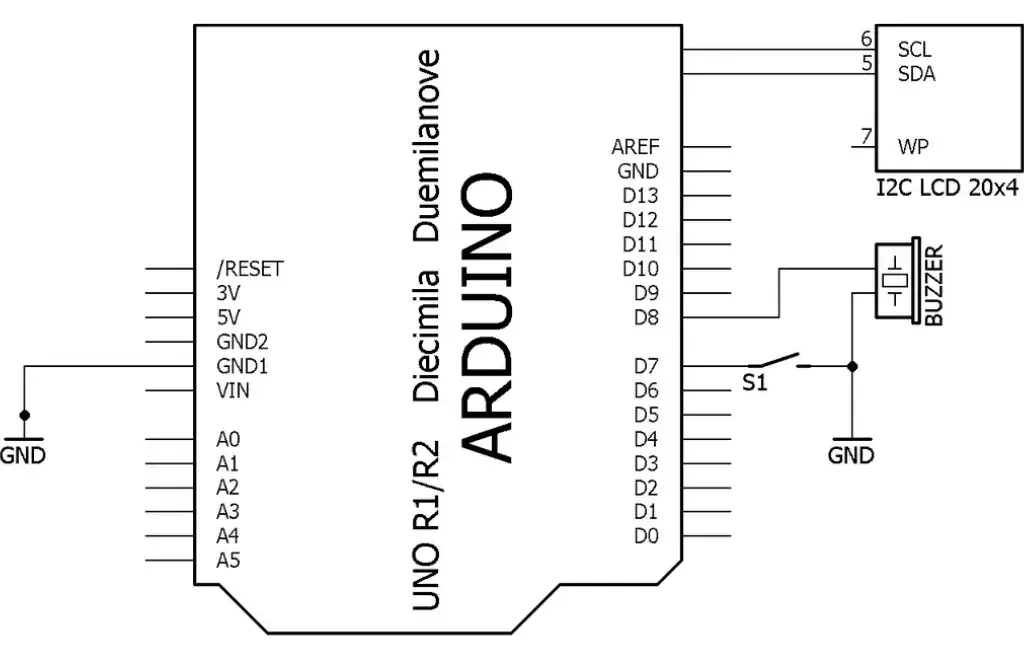
- Once done, attach the buzzer between the GND and pin 8 of the Arduino. Now, connect the Morse key or a switch between GND and pin 7.
- Apart from the GND and +5V pins, the LCD also has SCL and SDA connections, which should be connected to the corresponding pins on the Arduino. You can also use the pull-ups to connect the LCD if you want.
- Now, download the software sketch (Seinsleutel2.ino) and upload it to the Arduino and start keying. You can also include the library to control the LCD.
FAQs
Conclusion
Before concluding this article, all I want to say is that the Arduino Morse code converter can be an exceptional way of learning and practicing Morse code. Its making process isn’t complicated; it just requires a basic knowledge of electronics, simple coding, and Morse code logic. It’s also a fun way for those interested in historical communication methods. So, what are you waiting for? Start creating the Arduino Morse code now!
